Saturday, November 30, 2013

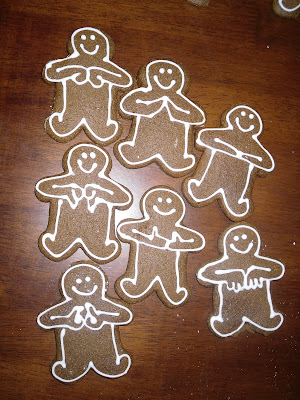
Gingerbread Do-Re-Mi Cookies!


My darling daughter Zoe is sol-sol smart!


Those who know me well know that I've been making gingerbread every year since I was 14, using pretty much the same recipe. I usually make lots of men and put candy buttons on them, or I make some houses using a form my sister-in-law Amy gave me as a gift (thanks again, Amy!).

Each year I made six batches, so I would have enough to share, even with my  music students and their parents. I can do 3x batch in my Bosch mixer if you have a Bosch, start with cookie paddles, then switch to the bread hook before adding flour.  I decided to make the cookies show the Solfeg hand signs (now that's one smart cookie!) for  music class.


Since many asked, here's the recipe. It came home from my baby brother Jacob's kindergarten teacher 20+ years ago.

1 cup shortening (I use 1/2 cup butter and 1/4 cup applesauce)
1 cup sugar
1 egg
1 cup molasses
2 Tb vinegar
5 cups flour
1 1/2 teas. soda
1 1/2 teas. salt
1 1/2 teas. ginger
1 teas. cinnamon
1/2 teas. cloves


Cream shortening and sugar. Stir in egg, molasses, vinegar. Sift dry ingredients and add. Chill dough, then roll out. (I like mine to be a bit thick and soft.) Bake on lightly greased pan at 350 for 8-10 minutes.

To frost these guys, I use about 1 1/2 cups powdered sugar, 1/2 teas. cream of tartar, and one egg white. I whip it until all is smooth, then put in my decorator's piping bag. I have tip sizes 1,2, and 3. I used size 2 in these photos. This frosting will dry up hard so you can toss them in a cookie jar without worrying that the designs will get smudged.
 

We play the game "Who stole the cookies from the cookie jar?" and when the kids perform their parts correctly, keeping the beat, I reward them with a real cookie from the jar!

Those are some smart cookies!

Monday, November 25, 2013

Practicing Autoharp at Home

Don't Have a Harp?

All first-year students enjoy playing the autoharp in class and a few lucky ones can practice at home.  For the rest of us, here are some tips for practicing autoharp skills at home without a harp!

Why Is An Autoharp Useful?


At Let's Play Music, we recognize that your child is sensitive, ready and excited for some fabulous musicianship training even though her young fingers don't have the dexterity she needs to practice those skills at the keyboard just yet. The autoharp gives us a beautiful way to grant her that learning experience while letting the fingers have just a little more time to mature and grow.

Playing the autoharp in class gives a student the chance to learn a multitude of skills simultaneously.  She will read and interpret the chord map, push the correct button with one hand, and strum with the other hand in good form.  She'll establish  a steady beat and then try to incorporate chord changes without losing it.  She'll sing the melody, practicing her ability to harmonize with her own accompaniment and match pitch to the instrument or CD.  Her ability to hear chords and cadences and identify them will improve


When it comes time to play piano, she'll be prepared to have her eyes reading and hands working.  She'll keep that beat and know how to start her motions with the timing to sound on the beat.  She'll be listening to her playing and self-correcting.  As she composes her own songs and accompaniments in year 2 and 3, she'll have the ear for chords to help her succeed.

In light of all the learning going on, would you be delighted to practice all of those skills and have it be almost as effective as using a real harp? 

Use Your Book


Your child will make great strides in these skills simply by pointing to the chords in her book as she hears them on the CD, or by pressing the chord triangels as if they are harp buttons and strumming the floor or table.  Don't make the mistake of under-using this simple, elegant tool that's already at your fingertips!  Still want more fun?  Read on!

Download an App

If you have an iPad or an iPhone at home, look for autoharp apps that you can download to practice playing your Let's Play Music songs!  "Musical Autoharp" by Thumb Wizards is $0.99. You can use any of the chord maps in the back of your child's Red and Blue semester practice books. If you don't have a tablet, keep reading for more autoharp crafts.

Where to Put Stickers:  A Very Short Theory Lesson


The app obviously does not have the colors of the chords, so  you may be left wondering what chords to play. If you look carefully, each button on the autoharp has a letter, as well as the word major or minor after it. 
 
Red, Blue, and Yellow chords will be identified as I, IV, and V chords in the Orange semester. In the key of C, the scale degrees are: C=1, D=2, E=3, F=4, G=5, A=6, B=7.  Yes, you will be quizzed on this in Orange semester!

There are two keys that our Let's Play Music harp songs are performed in: C or F.  We perform songs in whichever key ensures the melody falls within a comfortable range for children to sing. 

The key of C Major
Red chord (the I chord) = C Major      Put a RED sticker on C.
Blue chord (the V chord) = F Major     Put a BLUE sticker on F
Yellow chord (the IV chord) = G Major    Put a YELLOW sticker on G.

The key of C is great for playing songs from Red Semester: 
pg 55 Primary Chords Song
pg 57 Chords in Pieces
blog post 5 Fat Turkeys, 
and Blue Semester: pg 51 On top of Spaghetti
pg 54 Bill Grogan's Goat

Here is a photo of my daughter using the ipad.  I used paper post-its to indicate the chord colors...too bad it doesn't work well to stick real stickers on the ipad screen.

The key of F Major
Red chord (the I chord) =F Major      Put a RED sticker on F.
Blue chord (the V chord) =Bb Major    Put a BLUE sticker on Bb (B flat)
Yellow chord (the IV chord) =C Major   Put a YELLOW sticker on C.

They key of F is comfortable for singing Red Semester songs:
pg 56 Barnyard Boogie
pg 58 Ain't it Great to Be Crazy?
and from the  Blue Semester: pg 53 El Gallo

Make Your Own Autoharp: Easy

A quick and easy option is to print out a photo of the auto-harp push-buttons.  Now your child will have something to touch while reading the map and singing along! 

Make Your Own Autoharp: Awesome

I can already see the gears turning in the minds of artsy-crafty parents.  Why not make a full-on homemade autoharp!?

1. Start with a full photo of an autoharp.  Print it out in color (either 8x11 or 11x17).  I email files to my neighborhood office store and they print things for a small fee.

2. Mount it on some foam-core or cardboard or plywood to keep it sturdy.
3. Optional: Do you want to Mod-Podge over the image to protect it forever?
4. If desired, add texture to the "strings" of the harp.  We used Elmer's glue and ran a bead of glue along each string image.  When it dried it left a ridge on each string that my daughter can feel as she glides her fingers across.  You could lay down a length of fishing line or fine string into the glue as well, to get the texture. 
5. Add real stickers to the appropriate chord buttons. (read on for help finding the chords)

Teacher Emy LeFevre cut plastic sheets into harp shape (this would also work with wood) and machined grooves to give texture for strings and buttons.


Buy An Autoharp

If all that crafty talk made your head spin, you might be interested in simply buying an autoharp.  The great news is that your family will be a huge hit around the campfire, on long road trips, at the family-reunion talent show, and during TV-free week.  

LOOK FOR an autoharp with at least 21 chords.  15 chords can get you through your Let's Play Music experience, but you'll wish you had more when you start to play with your own fake book of favorite songs.  If you see diatonic vs. chromatic harps, choose the chromatic; it has strings representing every note, like both the black and white keys on the piano.

Used harps can be excellent, and a good buy as low as $100, especially if they come with a recommended case for keeping the harp safe.  Ebay is the most common place to find a used harp and Oscar Schmidt is the most common maker of harps at our level, costing $250-$600 or more new. 

You'll also need to pick up a digital tuner and a tool for tuning your strings if it was not included.

AVOID a harp  that can't hold a tuning or that has pins that seem very loose, which might be expensive to replace.   

If a string is missing or broken, however, you can probably replace it inexpensively. If the harp is not holding tune for more than a few weeks, you may need to replace all strings (we recommend you do one at a time or take it to a shop to have it done.) If you buy a used harp and find that it needs the felt replaced, that is another job you can reasonably do at home with an ordered kit.

Hurrah! Chord Maps Are Endlessly Fun!


Your Let's Play Music teacher has told you that the Red, Yellow, and Blue chords would open all kinds of possibilities for playing music.  She was right!  Since you went to all the work to make an autoharp (or download one or buy one or just read this entire post), we want to share more chord maps with you in next week's post.  Stay tuned! 

- Gina Weibel, MS
Let's Play Music Teacher

Sunday, November 24, 2013

7 Reasons I Love Solfeg!

We recently posted about the history of solfeg and its usefulness in ear training.  Today I'll share 7 more reasons Let's Play Music teachers use solfeg and LOVE IT!

1. There's a Word for That


Can you imagine teaching your child to identify colors without having any color words?  Not easy!  Similarly, as students learn to discern pitches and intervals between pitches, using a system  for putting a name to the pitches (solmization) facilitates the process immensely.  China, Japan, Korea, India, and Indonesia all have solmization schemes for associating pitch to a name.  When talking about fixed pitches, we use the alphabet (C is always C) and when talking about scales and relationships between notes in a scale, we use solfeg!

2. Whole-Body Involvement


Each of our young students (and even many of our toddler Sound Beginnings students) master the  hand signs and use them to experience singing, ear-training, and note-reading with their whole body.  As they hear the pitches moving up and down, their hands move up and down through space accordingly.  As they recognize intervals and relationships between the notes, they can feel the distance of jumps between pitches and grasp them with their hands.

Adding this kinesthetic mode of learning to an auditory and visual skill heightens a child's absorption of the information, accommodates various learning styles, and facilitates integration and long-term learning.  Solfeg is a popular tool for University students majoring in music fields;  it should be shared with young children, too, who adore and quickly internalize having a physical movement to put with their singing.  You already knew wiggly, active children enjoy having actions to accompany their favorite nursery songs, right?  If there's a way to make teaching more physical AND more fun for them, let's do it!


3. Understanding Scales and Key Signatures


Would you love to be able to quickly and easily sing every major scale?  You can do it today! You don't have to memorize the notes of every single scale, just memorize the 7 solfeg syllables and start singing on whichever pitch you wish to be DO.  That's part of the power of the moveable DO  (read more here): the relationships within each scale will remain the same.

'Do' corresponds with the tonic of whatever key a particular composition or melody is placed. Thus in the Key of C major, C is Do, and in the Key of F major, F is Do.  You can see those two scales already engraved on your Let's Play Music tone bells!  Truly, any bell or piano key could be Do.  Of course you'd have to add some black keys to your scale to get it to sound like a major scale, but now after a few months of Let's Play Music training, your child could pick out (by ear) which black keys were needed.

Do is the note that the music rotates around and pivots back to. Whatever key we sing in, Do really is home!  Most songs end by bringing the melody back to Do.


4. Intervals


I recently wrote about the powerful ways that mastering intervals will help you improve musicianship in your reading, singing, and composing music.

Solfeg is a handy tool for students wishing to master interval training.  The goal is to instantaneously recognize the precise intervals when heard, and having solfeg words to identify them can be very helpful in this process.  "The notes I just heard sounded like...Do-Fa! It's a 4th!"

Here are just a few relationships I think my Let's Play Music students can hear and identify:
Do - Re : major 2nd 
Do - Mi : major 3rd 
Do - Fa: perfect 4th
Do - Sol: perfect 5th
Mi - Sol: minor 3rd  : In class we sing this as Sol-Mi more often than as Mi-Sol, but they are the same interval of course.

5. Sight Reading Music


Choir class is a very common place to find solfeg at work; students are taught to rely on solfege for sight-singing melodies.  Singers can quickly read and sing the written melody if they interpret it in terms of solfege because they have learned the relationships between each solfege note and don't need to be retaught those relationships for whatever key the music is written in.

Here are some videos of students performing 4-part vocal music they have never rehearsed, using solfeg syllables and hand signs.

At the piano, sight-reading music in the same way and hearing it with our inner voice helps us to self-correct as we play.  Solfege allows us to be able to play a tune in another key (transpose) by choosing a new DO and playing the same solfeg pattern (see an example here.)  We will practice singing and transposing this way in Purple and Orange semesters!


6. Sharps, Flats and Minor Keys


Now that we know having a way to sing the steps of a scale makes it easier to learn music, some folks have wondered why we don't prefer to sing numbered steps (1,2,3,4,5,6,7) instead of the solfeg syllables.  The word 'seven' is already less-than-popular because it is not a monosyllable, but all of the numbers become problematic if we ever want to introduce sharps or flats.  'Raised-seven' is definitely not an easy-to-sing monosyllable!

With solfeg, for a note that is lowered a half-step, we sing it with an A sound (like in the word "nay") but spell it with an e. Thus mi becomes me (may), la becomes le (lay), ti becomes te (tay), etc. This works for all scale steps except re which is already an e sound, so re lowered a half-step become ra (rah!).

For a note that is raised a half-step, we sing it with an ee sound, but spell it with an i. Thus, fa becomes fi. This works for all steps except mi and ti, but they are almost never raised anyway. 

Here are the syllables for the chromatic scales (play every single key on your piano, both black and white, as you sing):
ascending: do di re ri mi fa fi sol si la li ti do
descending: do ti te la le sol se fa mi me re ra do

In Let's Play Music class, we won't spend much time teaching the raised and lowered syllables, but it is a beautiful and simple system to grow into as your child takes interest in further musical skills.  Each year I have one or two Orange students wanting to compose in minor keys, and I do help them master me, le, and te so they can be sure to write an appropriately minor melody.


7. Solfeg Works


The final, and perhaps best, reason I want to share about why Let's Play Music teachers love solfeg is simply that it works.  Students wanting to become better musicians (and get passing-grades in their college-level music classes) find that having the right tools will get the job done.  There's no need to wait until college; solfeg can help your very young child improve musicianship right now.  

- Gina Weibel, MS
Let's Play Music Teacher 
This post was originally posted at the Making Musicians Blog

Wednesday, November 20, 2013

Staccato Road Ahead!

From NPR.org

Thanksgiving Fun!

Just a reminder: there are no music classes Monday Nov 25-30.  Don't be too sad! Here are some fun Turkey extras to keep you busy.

First Year Students

It's great fun to sing the 5 Fat Turkeys song, so you can enjoy singing along with this video that answers a few basic student questions: Can turkeys really go in trees? What do real, wild turkeys look like?

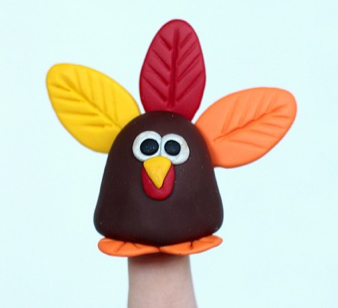
Of course you might be wanting to act it out, so craft up a felt or clay or paper version of Turkey finger puppets to play with (and make your table pretty afterward, too.)
Clay Turkey puppetturkey puppets


If you happen to have an autoharp at home, you can play this song using the chord map below, or you can point along to the map while singing with your CD.  No harp?  You could download a harp app for your ipad or just tap along while listening to your CD.  (The CD is in the key of F: Red=F, Blue=Bb, Yellow=C)

One main I love using this song on harp and keyboard for years 1 and 2 is the long string of red chords that give students a chance to focus on defining a steady rhythm before tossing a few chord changes.

Second Year Students

You're not too old for the turkey song!  Print out the chord map above, and use it to play the song on your piano.  If you haven't learned the BLUE chord in class yet, you can rest silently on that beat.

As a matter of fact, you have enough experience that you might even enjoy printing out a blank chord map, then using your ear to guess which color each triangle should be colored in.  Try playing each chord and see which sounds best!  Your ear will be your guide.


Chord maps aren't all you know how to read- you can also play from the real sheet music, and color in the chords if you like.

Third Year Students

Print out the blank chord map above and color it in (use your ear to figure out which chord is best)!  Practice playing chords with both hands and singing using your newly colored map or the sheet music.

For some really third-year work, use your right hand to play the melody of this song.
Before you begin, carefully look at the melody- there is a note played that is lower than middle C.  Can you figure out which note it is?  Walk down space, line, space below middle C....take baby steps to find out it's a G!  It's a FOURTH below C.  You have some options as to how you will play that note:  with your left hand in C position, you could just let your LH play that note when you come to it.  If you are playing the chords of the song with your LH, your chord is going to strike the G anyway, so you could decide to let your RH rest instead of playing G.  Finally, you could play it as written and have your RH jump down to G and then back up to C position.

Perhaps your uncle you only see twice a year will play a duet with you and play LH while you play RH.  Piano is a very fun way to bond!

Graduates

Have some Let's Play Music graduates in the house?  Play through the assignments for the younger years, then listen to the accompaniment as played in the video above.  Can you tell what the pianist has done with the chords to make it fancy?  During the instrumental verse, the pianist really has fun! Now YOU improvise as you play and make yours sound fancy, too!

Hint #1: Review Yankee Doodle from Orange semester for two-handed marching ideas.
Hint #2: To have a broken chord fit in 4/4 time, add one extra note, ie: Do-Mi-Sol-Mi.

Put On A Show

Now that you have at least one song to sing (and play), why not round up a few of your other favorite songs and put on a show!?  Thanksgiving is a great time for family to gather and share the love of music.  If you're lucky enough to have Let's Play Music students in different levels, you can ALL enjoy this song.  Perhaps you can also teach your relatives the parts to your favorite puppet show, and perform it together while waiting for the turkey to come out of the oven.

Happy Thanksgiving!

-Gina Weibel, MS
Let's Play Music Teacher
-This post was originally posted at the Making Musicians blog